Pages

Sunday, September 6, 2015

Chicken Fajita Soup

I am transferring all of the recipes from my soon to be defunct food blog to this blog!  Here's a good one!
I am a “repeat eater”…meaning, I’ll eat the same thing for lunch all week and not get sick of it.
But, I like a good repurposing-the-leftovers meal as much as the next girl!
Enter Chicken Fajita Soup which uses awesome leftovers from yesterday’s Oven Baked Chicken Fajitas!
Chicken Fajita Soup // Becky's Happy Table
Before I get to the recipe, which, in addition to the leftovers, includes mostly pantry items, I’m going to let you in on a little soup secret.
When I’m making a broth based soup (not a creamy one), I very often add chopped up kale!  You don’t even taste it but it still brings all of it’s healthy goodness to the table!  I call that winning!
I just grabbed a handful of baby kale (how cool is it that Aldi carries this!) and pull out any big stems.
Chicken Fajita Soup // Becky's Happy TableI grab a pair of kitchen scissors and cut the kale into bite sized pieces, letting it drop right into the pan!
Chicken Fajita Soup
Author: 
Recipe type: Soup
Prep time:  
Cook time:  
Total time:  
Serves: 4
 
This soup is a great use of leftovers and the perfect cover for some kale! I'm looking forward to having this for lunch for the week!
Ingredients
  • 2 cups chopped leftover fajitas
  • 1 14.5 ounce can of diced tomatoes (I used fire roasted because Aldi had them)
  • 1 10 ounce can of tomatoes and diced chilis (like Rotel, but I call them Faux-tel in my head because it's the generic brand :))
  • 1 15 ounce can of black beans, drained and rinsed
  • Handful of kale, chopped (optional)
  • 4 cups low sodium chicken broth (I use the Fit and Active chicken broth in a box)
  • 1 teaspoon chili powder
  • 1 teaspoon cumin
  • ½ teaspoon oregano
  • Optional: any toppings you'd like, such as sour cream, cliantro, salsa, cheese, crushed tortilla chips, chopped avocado, lime, etc.
Instructions
  1. Combine all of the soup ingredients (excluding the optional toppings) in a pot.
  2. Bring to a boil over medium heat. Then, lower heat to maintain a gentle simmer for at least 20 minutes or at least until the kale wilts.
  3. Enjoy the soup with which ever toppings you'd like...but, pretty please, don't skip the lime!

Oven Baked Chicken Fajitas

I am transferring all of the recipes from my soon to be defunct food blog to this blog!  Here's a good one!
Do you know what’s a thing?  Witching hour…the time between kids coming home from school and supper time.  That’s a thing.  A real thing.  A stressful thing.
I do my best to get as much supper prep done as possible before witching hour.  These fajitas (adapted from Baked Bree) totally fit the bill!
Oven Baked Chicken Fajitas // Becky's Happy Table
The meat and veggies marinate for an hour or longer.  I started marinating the meat in the morning…when I was caffeinated and more, shall we say, mentally sharp than I may be during witching hour.  The marinade doesn’t have an acid in it (citrus juice or vinegar), so it doesn’t chemically cook the meat if you leave it in for too long…nobody wants fajita ceviche.
I should have shredded the cheese and lettuce and made the guac during Gracie’s “quiet rest” (aka the biggest misnomer of our time as it is rarely quiet or restful) while Leah and Maggie were at school.  But, I believe I was doing something else very pressing like looking at Facebook.  ðŸ˜‰
When you’re ready, just put the meat and veggies on a foil lined sheet pan and bake!
Oven Baked Chicken Fajitas // Becky's Happy Table
After 20-25 minutes (and a bit of time under the broiler), you have fajitas!
Oven Baked Chicken Fajitas // Becky's Happy Table
I love fajitas with lettuce, a bit of cheese, salsa, and lots o’ guac!
We love the flour tortillas from Aldi, too!
Oven Baked Chicken Fajitas // Becky's Happy Table
Oh, and in full disclosure, the girls eat cheese quesadillas when we have fajitas which just means more leftovers for the grownups :)
Oven Baked Chicken Fajitas
Author: 
Prep time:  
Cook time:  
Total time:  
Serves: 8
 
Make ahead and bake when you're ready! These definitely cut down on the dinner time crazy!
Ingredients
  • 4 tablespoons extra virgin olive oil
  • 2 cloves of garlic, minced
  • 1 teaspoon chili powder
  • 1 teaspoon cumin
  • ½ teaspoon oregano
  • 1 teaspoon salt
  • ½ teaspoon pepper
  • 4 chicken breasts cut into thin strips
  • 1 red bell pepper cut into thin strips
  • 1 yellow bell pepper cut into thin strips
  • 1 red onion cut into thin strips
Instructions
  1. In a gallon sized zip topped bag, combine olive oil, garlic, spices, salt, and pepper. Squeeze it all together to combine. Add the chicken and veggies. Smoosh it all together to combine. Refrigerate for 1 to 24 hours.
  2. Preheat oven to 400 degrees. Line a baking sheet with aluminum foil. Put the chicken and veggies on the baking sheet in a single layer. Bake for 20-25 minutes or until cooked through. Broil on high for 3-5 minutes or until there's a little singe on some of the veggies.
  3. Serve with your favorite fajitas fixin's!

Be sure to check back tomorrow for a great use of leftovers…Fajitas Soup!

Celebration Cake

I am transferring all of the recipes from my soon to be defunct food blog to this blog!  Here's a good one!
Here are 2 things you likely don’t know about me:
1.)  I watch The Bachelor (ette).  I know.  It goes against pretty much everything I believe about how men and women should relate, how and where women should find their value, and, um, all the other things.  It’s a train wreck I can’t stop watching!  But, to my credit, I think it is hilarious and unrealistic and I watch it purely for entertainment purposes and not to model my life after.  I thoroughly enjoy the spoilers and hysterical recaps.  Additionally, I nevernevernever let the girls watch.  Oh, and I still love Jesus…these things are not mutually exclusive (obviously).
2.)  I can’t make a white or yellow cake from scratch to save my life.  I’ve made ones the claim to be The Best Ever and they end up tasting like cornbread.  No bueno.
How do these 2 random facts interact?
Celebration Cake // Becky's Happy Table
When Sean (who was, undoubtedly, the least shady bachelor) was The Bachelor, I found out that his sister, Shay, blogs.  I started reading her family blog and occasionally checking her food blog.
Celebration Cake // Becky's Happy Table
She has recipes for 100 different bundt cakes that she mixes and matches with cake and pudding mixes.  While I don’t usually bake with mixes, I gave this white celebration cake a try (with my own frosting) and it was amazing!  It’s flavored with almond extract and is sweet and perfect.  It tastes just like you would want a wedding cake to taste…hence the whole celebration part.
A note about bundt cakes…
Celebration Cake // Becky's Happy Table
this is not, I repeat, NOT the time to be stingy with nonstick spray.  Spray the living daylights out of your bundt pan.  You don’t want the cake to stick or it’ll end up all wonky.  I mean, it’s nothing a little frosting can’t fix, but it’s easier to cut a cake that is in one piece and not patched together.  It’ll taste great no matter what, though :)
Also, every time I think about a bundt cake, I hear this scene from My Big Fat Greek Wedding in my head…
Enjoy my adaptation of this recipe…there’s always a reason to celebrate!
Celebration Cake
Author: 
Recipe type: Dessert
Prep time:  
Cook time:  
Total time:  
Serves: 8-12
 
This cake makes every day a celebration!
Ingredients
  • For the cake:
  • 1 box white cake mix
  • 2 boxes (small, the 4 serving size) instant vanilla pudding
  • ½ cup canola oil
  • 1 and ¼ cups water
  • 4 eggs
  • 2 teaspoons almond extract
  • For the frosting:
  • 2 cups powdered sugar
  • 4 tablespoons room temperature butter
  • ½ teaspoon vanilla
  • 1 teaspoon almond extract
  • 1-2 tablespoons milk or cream
Instructions
  1. For the cake:
  2. Place all of the ingredients in a bowl and mix until incorporated. I always scrape the bottom of the bowl with a spatula as the dry ingredients can get stuck down there. Pour into a well greased (I use nonstick spray) bundt pan (10 inch) and bake at 350 degrees for 40-50 minutes or until a toothpick you've poked into the cake comes out clean.
  3. Let cool for 10 minutes. Remove from bundt pan onto your serving plate and cool completely.
  4. For the frosting:
  5. Measuring the powdered sugar into a medium bowl. Mix in the butter until crumbly. Add the extracts and 1 tablespoon of the milk or cream. Mix on high speed until creamy, adding as much milk or cream to get it to the desired consistency. Sprinkle with your favorite celebratory sprinkles.

Cherry Pumpkin Flax Trail Mix

I am transferring all of the recipes from my soon to be defunct food blog to this blog!  Here's one!
My Aldi carries Nature’s Path Organic Pumpkin Flax Granola.  It’s $5.99 at our regular grocery store, but it’s $2.99 at Aldi.  I call that winning :)
While I like it with milk for breakfast as much as the next girl, I threw a few odds and ends in with it and made a great trail mix!
Cherry Pumpkin Trail Mix // Becky's Happy Table
For 1 serving, I put into a bowl: 1/4 cup pumpkin flax granola and 1 tablespoon each dried cherries, shelled pistachios, and mini chocolate chips.
Cherry Pumpkin Trail Mix // Becky's Happy Table
It’s worth noting that I tear the bigger cherries in half to spread about the cherry goodness :)
Give the bowl a stir or a shake and, TA-DA!  A quick, easy, relatively healthy snack!  It’s perfect for fall.
Cherry Pumpkin Trail Mix // Becky's Happy Table
I feel like it goes without saying, but I’ll say it anyway :) , it’s super easy to increase the amounts to feed more people!

Blackberry Goat Cheese Spread

I am transferring all of the recipes from my soon to be defunct food blog to this blog!  Here's a good one!
Blackberry Goat Cheese Spread // Becky's Happy Table
I threw this together when I somehow coerced my friend, Bri, came over to watch The Bachelor with me (even though it is one of the most ridiculous things ever, I can’t.stop.watching.it).  Bri is lactose intolerant, so I wanted to make something she could have.
I love the contrasts within this, too!  The sweetness of the preserves, mixed with the tang of the goat cheese and the saltiness of the crackers is a delicious contrast.  Plus, I love the visual contrast of the dark purple preserves and the white cheese.  Not to mention the textural contrast of the crispy crackers and smooth cheese.  All the good things!
Plus, you only need to pick up two ingredients
Blackberry Goat Cheese Spread // Becky's Happy Table
and whatever you choose to use as a dipper.  I just grabbed the thin wheat crackers.
Blackberry Goat Cheese Spread
Author: 
Recipe type: Appetizer
Prep time:  
Total time:  
Serves: 2-4
Filled with beautiful, delicious contrasts, this is perfect for your next girls night in!
Ingredients
  • 4 oz log of honey goat cheese
  • ½ jar of blackberry preserves (or to taste)
Instructions
  1. Open the log of goat cheese and place on your serving dish.
  2. Using a spoon, spread blackberry preserves over the entire log of goat cheese...except for the bottom.
  3. Optional: after you spread the goat cheese log with preserves, let it come to room temperature so the goat cheese is smoother and more spreadable.
  4. Enjoy with your favorite cracker!

Monday, August 17, 2015

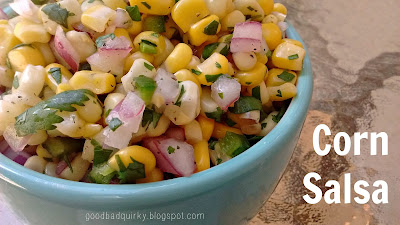
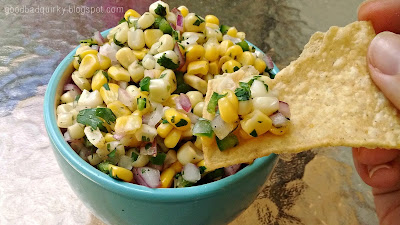
Corn Salsa

This corn salsa is quite possibly one of the best things to come out of my kitchen in a long time. 

Corn Salsa (better than Chipotle!!)

It is even better, dare I say, than Chipotle's corn salsa.  I realize what a tremendous statement that is!  But, I made this salsa for a weekend away with friends, and on the ride to the cabin, we stopped for lunch at Chipotle.  I had their corn salsa.  It was good.  

The next day I had this corn salsa.  It was better!

Corn Salsa (better than Chipotle!!)

Also, I'm one of those weird people who make a vast majority of the salsa they eat.  I think it's really fun to put out a trio of salsas when people come over for supper and we're having Mexican food.  I have a triple bowl serving dish, so I put corn salsa in one, salsa verde in another (still finding a recipe I like), and red salsa in the other (this recipe, tweaked, is my favorite).  The corn salsa always goes first!

As you probably know, I am a devout Aldi shopper, and I don't have a lot of brand loyalty when it comes to food.  Corn for this corn salsa is an exception.  I always use this corn...


I think you'd be fine using any frozen corn that's smaller and that's labeled "super sweet."

Here's the recipe!  It's easy peasy...just some cutting!

Corn Salsa
adapted from a recipe from my friend, Bri

1 16 oz bag frozen corn, thawed
1 jalapeno pepper, seeds and ribs removed, diced
1/2 red onion, diced
bunch of cilantro, top half of the bushy part, finely chopped
1-2 tablespoons sugar
juice from 1 juicy lime
salt and pepper to taste

Combine all of the ingredients in a large bowl.  
Taste the salsa on a tortilla chip to see what it needs.

Why so emphatic about tasting on a tortilla chip?  Tortilla chips are salty, and seeing as you largely eat salsa on tortilla chips, you can have a better feel for how much salt you need to add to the actual salsa.  Nobody wants over-salted salsa!  For the record, On the Border Cafe Style tortilla chips are my favorite.

I find that I usually need to add more lime juice and some salt and pepper to the salsa when I'm making it...so have an extra lime on hand just in case!  

Also, don't freak out about the sugar in there.  I've tried it without sugar, and it really does need a bit!   

This corn salsa is the perfect addition to any Mexican food meal (great on tacos, too), but is perfect for a cook out or for just eating outside on your deck or patio or lawn!  

Just in case you're hungry for more Chipotle, give this a try

Thursday, June 11, 2015

The Last Day of School

I like to do something a little special for the last day of school, so this year I decided to make donuts.  


Now before you start thinking that making donuts is the hardest and fanciest thing ever, let me assure you, it is not.  You're basically making muffin batter but baking it in a donut pan (I got one as a gift a few years ago) instead of a muffin tin.  I made these donuts.  

We even ate breakfast outside which got the day off to a super fun start!

Leah had an awesome year!


She really liked her teacher and her class.  Her teacher was really intentional about building community among the students, and it was obvious that her efforts paid off.


She nudged Leah a lot in growing in independence and cultivated her love for reading.  The 3rd graders finished the year with a big Charlotte's Web unit, and Leah loved every bit of that!  She was also really supportive and encouraging as we have been helping Leah overcome her fear of dogs...such a gift!  I also appreciated that she didn't give a ton of homework which gave Leah a lot of opportunity to read and just be a kid at home.  We are really thankful for her!

Maggie had an amazing year, too!


We, ah, had a hard time getting a natural smile for the last day of school picture :)

Kindergarten is pretty much the most fun thing ever!  Maggie loved going to school every day and was excited to learn and learn and learn.


Maggie's teacher was my friend before she had Maggie in her class, so that was extra fun!  I think it must be the most rewarding thing ever to be a Kindergarten teacher on the last day of school and look over the classroom of little kids and know that you taught them all how to read!  How awesome to know that you've opened up an incredible world to them.  

Karina made learning so fun and exciting, and she created an environment that made Maggie feel safe and cared for.  She also has been super instrumental in helping Maggie move towards overcoming her fear of dogs.  They've had a couple of dog visitors, which, largely due to Karina's help, Maggie handled really well.  Karina has believed in Maggie, delighted in Maggie, and given her tremendous amounts of courage.  I'm so, so grateful!

This lady and I had a fun last day together, too!


We got the ice and water dispenser in our fridge fixed* for literally the first time in Maggie's life.  Gracie's water consumption has probably quadrupled!  It's kind of hazardous getting ice when the dispenser is at eye level, because sometimes the ice jumps out of the cup and into your face!  We worked on how to hold the cup to prevent ice inflicted injury, so things are smooth sailing (or smooth drinking/chewing ice) from here on out!

* And by "fixed," I mean that I apparently put the filter on wrong so it didn't work.  The appliance repair guy just put the filter on and everything was fine.  Oops :)

I'm thankful for such a great school year with these 3 and am hopeful for an equally awesome summer!